DIY or Buy?

Wedding invitations…there are so many gorgeous wedding invitation suites out there! OMG! That was actually the first thing the Mr. and I looked at, lol! We went to the most beautiful paper boutique in Portsmouth, NH just days after our engagement.  I was so excited! Just a little fair warning it only takes you about umm 5 minutes to fall in love with everything! If you are ever in that area you have to stop by Gus & Ruby, not only do they have beautiful paper goods but, they also have great gifts! But, for us buying the type of custom wedding invitation suite that I soo wanted was just not in the budget. So, I got to work! I was going to get the custom suite I wanted by DIYing my heart out.  One thing that I would definitely recommend if you plan on DIYing your wedding invites is to wait until after you have your wedding venue selected and your general design plan for the wedding: decor, cake, dress.  So you know what type of look would suit everything. I started out just researching design elements that fit with our look that I could incorporate easily.  Our venue as I have mentioned before reminds me so much of Jay Gatsby’s house straight off of the 1974 set of the film (swoon Robert Redford). So, some of our design inspiration has come from the Jazz Age.  However, at the same time I wanted to keep them modern with a bit whimsy.  Here are some of the elements that inspired me:

1, 2, 3

The design process was actually a lot of fun for me.  I would print out the updates as I incorporated different elements to show the Mr. and he would give me some input.  It was really a great team project.  Then we got them printed using our handy, dandy Groupon saving tons of money.  All that is left is assembling them, postage, and calligraphy. We were actually snowed in yesterday so, we got a good dent into the assembly process.  It was such a great sense of accomplishment seeing how it all came together.  I couldn’t be happier! Plus, I am so grateful that we didn’t have it in our budget for the fancy letterpress suite.  We would have missed out on collaborating on such an amazing project together.  We were snowed in with the fireplace on in our PJs putting them together.  It was a great day!

Groupon Can Save Your Wedding Budget

Ok so I know it sounds crazy, Grouponing your way through wedding planning. However, Groupon has been a huge moneysaver for us.  DIYing all of our wedding stationary has been a huge help, but we wouldn’t have been able to have them printed at such a huge discount without the help of our new friend Groupon, look at the savings

GrouponSavings

Source: Association of Bridal Consultants

Obviously we were thrilled! So, now that I have learned what a difference a Groupon can make I have been on the look out for anything that could help me trim off some of the fat of our wedding budget.  Just this week I was able to get a beautiful Aiden Mattox dress for our rehearsal dinner from Saks for 80% off, saving over $100 thanks to Groupon.  Check out the Groupon deals available now in the Baltimore area & see if Groupon can save your wedding budget too.

Save the Date, the BIG Reveal

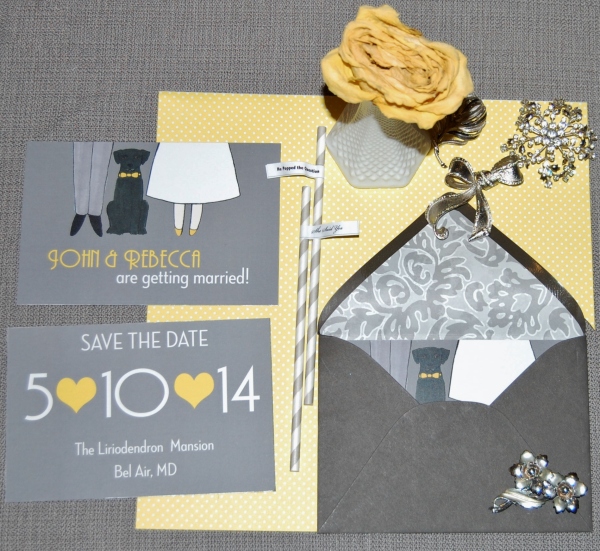
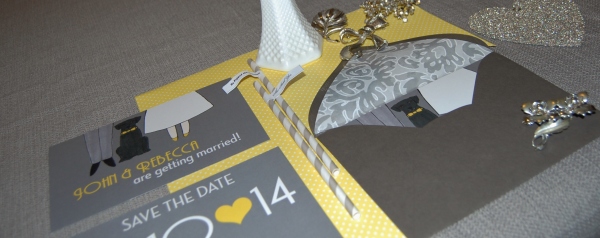
I know there has been a lot of talk about our Save the Dates the past few weeks around here, but I promise this is the last post.  A big thank you to all of our friends & family and your very sweet compliments regarding the recent arrivals to your mailboxes.  It was so nice to see them the past few days.  I just wanted to show you guys what all the hype was about and give you a BIG reveal of our design…from the card to the beautifully lined envelopes and everything in between.

Save the Dates, 1

Save the Dates, 2

Save the Dates, 3

Save the Date, Quick Tip

We dropped our Save the Dates off at the post office yesterday, YAY! When I was on my way out of my office headed out to the post office, I was chatting with one of my lovely co-workers who shared a great tip with me…so I wanted to share it with you.

I was fully attending on just dropping off the Save the Dates with a smile and a thank you.  Boy was I wrong… you do not want to use the automatic sorter for your precious wedding stationary.  You can easily have the post office weigh your Save the Date or invitation and verify that you have the correct postage and then opt to stamp on the postmark yourself, its called hand cancelling. This will eliminate the necessity for the envelope to go through a machine that often results in some damage to the invitation (at least some sort of crease), and always leaves machine marks and creases on the beautified envelope that was electronically addressed in a illustrative font or tastefully addressed by a hand calligrapher.  Just make sure when hand cancelling that you get the postmark on each stamp and then you are all set.  These are all of our lovely guests’ Save the Dates looking sharp with their postmarks (and their addresses blurred out).

std - Copy

It only took me like 5 minutes and it provided me with so much relief.  Lucky for me there won’t be any nightmares of the automated machine destroying all of my hard work.  DIY wedding stationary is a labor of love and it is definitely not worth risking!

Save the Date, Inspiration

While we are working on a few finishing touches, the Save the Dates will soon be going off in the mail.  Yay! I am so excited!  So much so that I can’t wait until they arrive in our friends’ & family’s mailboxes. I had to do a little breakdown of the inspiration with you to hold me over until they arrive.

Let’s start off with a confession: I AM OBSESSED WITH SUBTLE DETAILS.  I can’t help it.  Any opportunity I had to customize this little piece of mail I did, luckily with lots of patience and help from the Mr.

First things first, the custom portrait (more info on that here).  My inspiration was this invite that I saw on Style Me Pretty.

pevan_invites_003$!600x

I loved the idea! I just knew that I couldn’t create it personally so, I immediately thought of an artist I had been following for a few years, Jordan Grace Owens.  Once we started the process it went from a simple sketch to being much more detailed and involved portrait, shocker (sarcasm).  Jordan was awesome and I am so happy with how it came out.  The Save the Date doesn’t feature the entire portrait, but our guests will get to see a glimpse.  The grand reveal will be in our wedding invitation :)

After we finalized the portrait I concentrated on font choices. Here are some of the front runners. Then the layout and design.

Then printing…while the printing process wasn’t necessarily inspired.  I wanted to share with you our experience so, that if you were thinking of using the same printer you wouldn’t make the same mistake I did.  We were trying to be budget conscious and got lucky enough (or so we thought) to stumble upon a Groupon for VistaPrint. So, that is where we decided to get them printed.  We uploaded the design and waited for them to arrive in the mail.  When they came in mail I was beyond excited to open the box up and get my hands on them.  They looked just as I imagined and I was so happy.  That is until I realized they were the wrong size.  They didn’t fit into the envelopes we had worked on for weeks with the pretty liners and everything.  My heart sank…I got a little bridezilla I’m not going to lie.  Vistaprint advertised these as 5X7 but, they were in fact 4.61 x 7.17, which is why they didn’t fit.  Fine print, essh.  It just so happened that the way I navigated the Vistaprint site, it wasn’t visible to a normal person with imperfect vision. Word to the wise: if you are planning to use VistaPrint for any invitations start here that way you can actually see the correct sizing.  I found this after the fact.  Anyway, I called and spoke with VistaPrint on the phone for over an hour.  It wasn’t pleasant.   They were rude, I was rude, and they refused to refund my Groupon or replace the incorrectly sized Save the Dates. They did however, refund what I paid over the value of the Groupon and then I called it a day.  The following day I called Groupon and they refunded me the cost of the Groupon because of how poor the customer service was at VistaPrint. There is a God! Lol! I was so relieved. After all that the Save the Dates were FREE… FREE=GOOD!  How’s that for budget conscious?! Yay! Instead of tossing them we decided to cut the Save the Dates down to fit our envelopes. While the edging’s finish wasn’t as pretty as I had hoped, it worked…

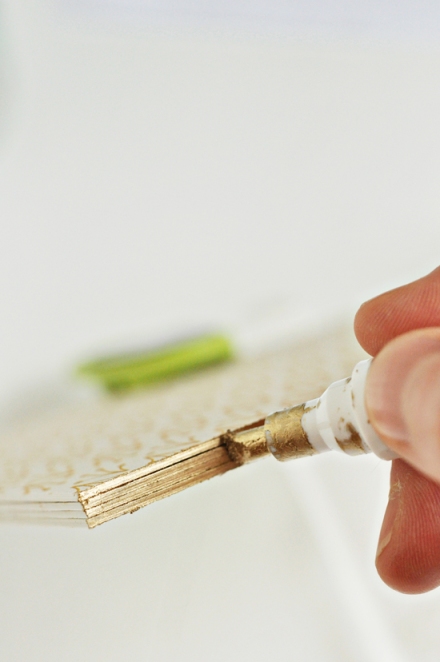
However, I of course couldn’t leave them that way.  I was focused on how I could get the edges a little more refined and probably like 6 weeks later I found this.  Gilded edges, I don’t think it gets more refined than that.  While gold doesn’t fit our color scheme, silver certainly does.  With one quick trip to Michael’s for the silver leaf paint pen and maybe like 20 minutes updating the edges, I was able to give out the sigh of relief I had been looking for for over a month.

IMAGE-6_LeafingInvites_550

One word: BRILLIANT! I couldn’t finally let it go and move on.  And get a little more sleep.

Then of course we slipped them into our pretty lined envelopes addressed by our calligrapher and pimped out in our vintage stamps.  Now, they are all set for the mailman. So keep an eye out family & friends.  They will be coming soon.

Wedding Paper, Part III

Okay, so I like many brides spend countless hours dreaming of lofty pinspired DIY projects.  More often than not I have fallen prey to how simple these project seem.  I march into the local craft store with all this enthusiasm and excitement to only end up frustrated and with at least $50 missing from my checking account.  I’m pretty sure the future husband is real close to demanding a cease fire on all the DIY, but he has been pretty awesome and supportive through it all so far (which is one of the million reasons I love him so much).

Most recently, the DIY du jour was the DIY envelope liners that I alluded to last week here.  Lucky for us this DIY was not only super simple but, it ended up being a fun project for the two of us.  Here’s how we did it:

envelopelinersDIY

1. Get the goods. You will need: the right size envelope liner template (love these from Paper Source), patterned paper of your choice (1 sheet per envelope), a pen, a pair of scissors, double sided tape.  If you gather all your supplies in advance, you will save yourself a lot of time.  Double check that you have enough patterned paper for all of your envelopes, so you don’t have to pause mid-project.  A lesson we had to learn the hard way because we ran out, not fun.

2. Trace the appropriate envelope liner template depending on the size of your envelopes onto each back side of the sheet of patterned paper.  Or, if you are feeling brave stack a few up.  We did like 4 at a time and it worked out just fine and saved us a lot of time.

3. Use your scissors to cut out the envelope liners.

4. Once you have all the envelope liners cut out place each one inside the envelope and fold the flap down to crease the envelope liner.

5. Remove the liner from the envelope and place your double sided tape on the top of each side of the rectangle portion and then on the sides of the triangle portion as well as on the rounded tip. Smooth to secure. Repeat on all of your envelopes.

Stand back and look at the beauty that is your envelopes! Enjoy!

Wedding Paper, Part I

I have been dying to begin the wedding paper process!  As a crafty DIYer this is probably one of the most fun aspects of the planning process for me.  I love fonts, I love artsy, I love vintage, I love playing with paper!  I love details! We are going for an Art Deco inspired feel because our venue looks like it it straight off the set of The Great Gatsby, so that has set the tone for some of our choices.  Speaking of fonts check out some of the contenders for our wedding stationary:

fonts

The whole process actually kind of began coincidentally, I went into Michael’s for supplies for my DIY Elva Fields Inspired Statement Necklace and low and behold a paper sale! Woot! I bought up everything they had that in an art deco/whimsical print in gray and yellow for 16 cents a piece. I was stoked and so was Mr. Chadwick (any time I save any money he is excited), which finally gave me the reasoning to purchase Paper Source’s envelope liner templates.  I have been staring at them online for way too long.  Before I couldn’t justify buying them just because but, now that I have them I know I am going to find a million uses for them.  First off, our Save the Dates!

Our Save the Dates are coming along nicely, we have been working with the lovely Jordan Grace Owens on our custom portrait, mentioned here and it’s almost complete.  We are going to feature a sneak peak of the portrait in the Save the Date and unveil it on our invites and the rest of our fun wedding paper goods.   Yay!

I have played around with so many fonts, layouts, designs…lucky for me Chadwick will indulge me with some input.  I definitely think he underestimates his artistic eye because his input has greatly improved the overall design.  Plus, he has helped me stay focused, which can be quite the task.

So hopefully the Save the Dates will be getting mailed out relatively soon :)

Inspiring Photos Forever

Inspiring People

pretty little loser 22

After my 105 pound weight loss, I started this blog to inspire and motivate others to live a healthy lifestyle!

MeridianBride

DIY Wedding Invitations For Your Perfect Day

The Sparkly Blog

FOR ALL OF LIFE'S SPARKLY MOMENTS

whimsy and whit

"She lets her imagination run away with her"